
Last week we went over how to identify tracks that were mis-tagged or not tagged at all using MusicBrainz’s Classic Tagger application. Now that we have most of the tracks tagged a little bit, we have a launch point for getting them tagged accurately and thoroughly. What I am talking about when I mention tagging your music files, is inserting information into what is commonly known as the ID3 tags of an mp3 file. Most digital audio files (save for WAV and a couple of others) do not have some form of metadata capacity in them and are thus incapable of storing song information inside the file itself. If you plan on storing your music in a high quality digital audio file like WAV or AIFF, then I would suggest utilizing a format like the open sourced lossless compression format known as FLAC (Free Lossless Audio Compression). The advantage to using a lossless codec like FLAC, is that the file format is taggable. So when you use a lossless codec like FLAC, you not only get tags but you also can take back some file space while still maintaining a format that will allow access to a WAV file, should you desire to ever go back to WAV.
This week’s tool of choice is SoftPointer’s Tag & Rename. This program comes with a trial period if you chose not to buy the software. I highly recommend that people buy the software if they manage large digital music collections. Tag & Rename is by far, one of the best digital file tagging and renaming programs in existence, and believe me when I say that I have tried a TON of them. Here are some reasons that Tag & Rename is better than other tagging/renaming software:
- Easy to understand interface
- Easily edit just about any tag in the current ID3 tag standard
- Great interface for getting tags from filenames as well as vice versa
- Amazon lookup that fills in just about everything
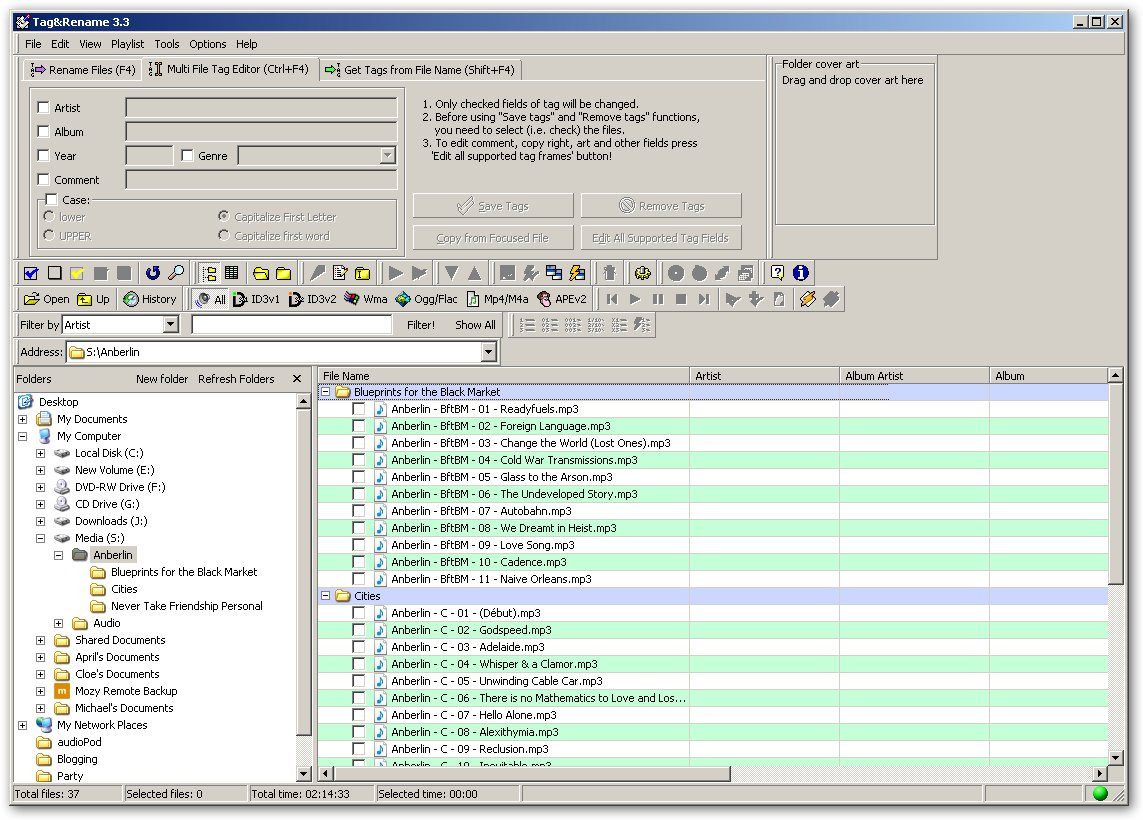
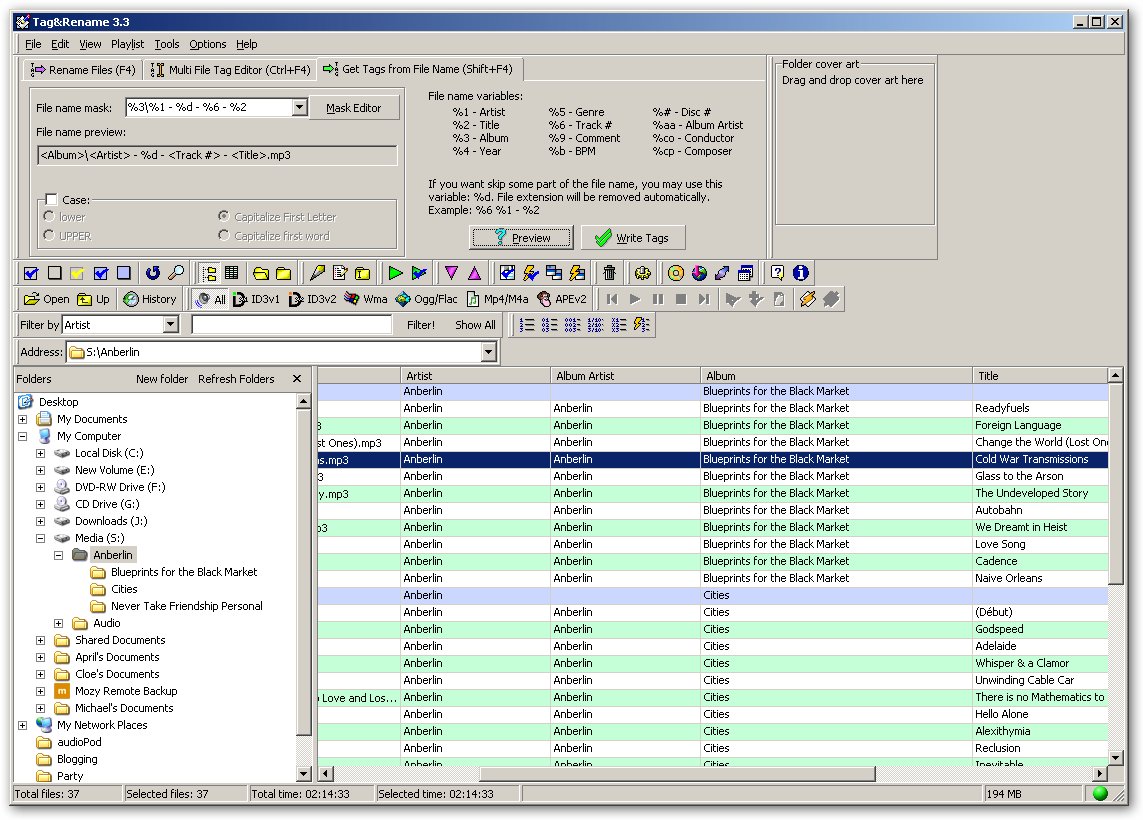
We will use all of these great features today. For this week’s tutorial, I will be tagging a couple of albums by a band called Anberlin. This will allow me three examples to show you how to use Tag & Rename to it’s fullest potential. I will also be sticking to my rule of not walking you through the install of the program. Here is what Tag & Rename looks like.
Lets start with tagging from the file name. To do this, we select the tab for "Get Tags from File Name (Shift+F4)" and we will see a window that looks like this:
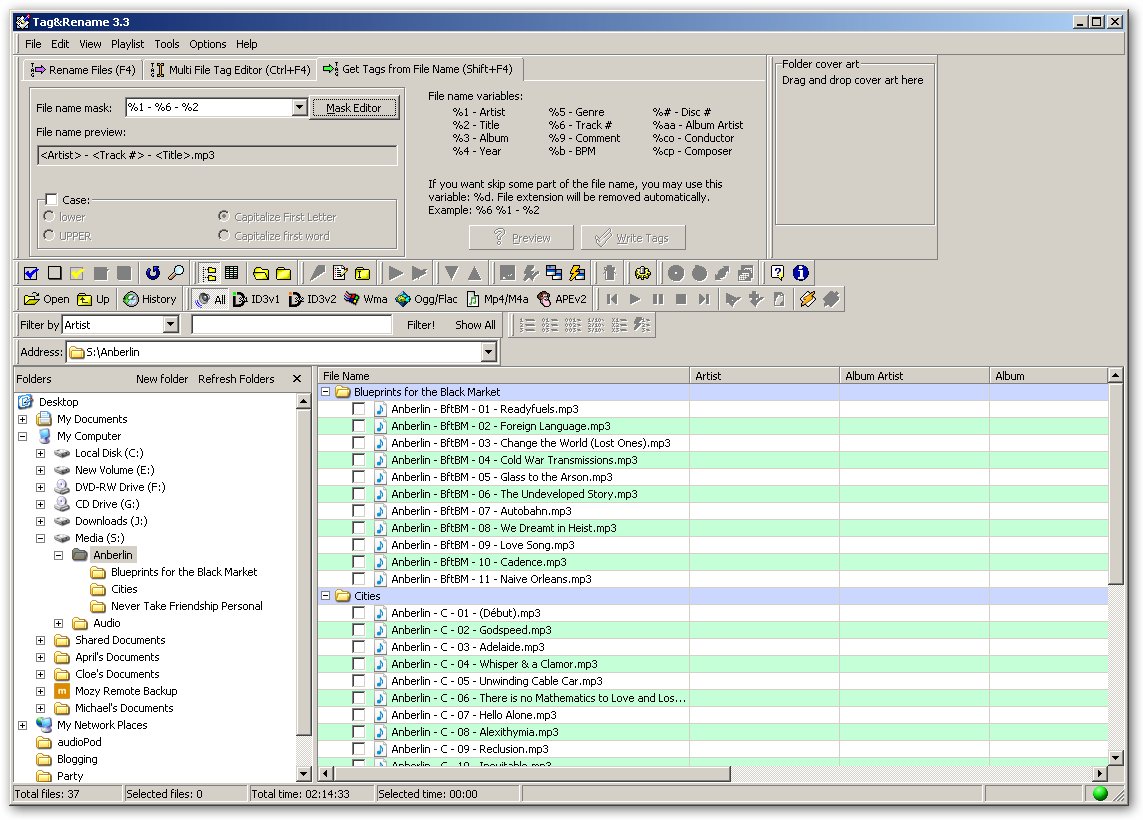
We have 2 ways of setting up our file mask. This mask will tell Tag & Rename how to read the files for tag information. The first is to type things in by hand. This is simple enough since they give us a legend to the right of the mask drop-down. The other option is to use the mask editor (as show below).
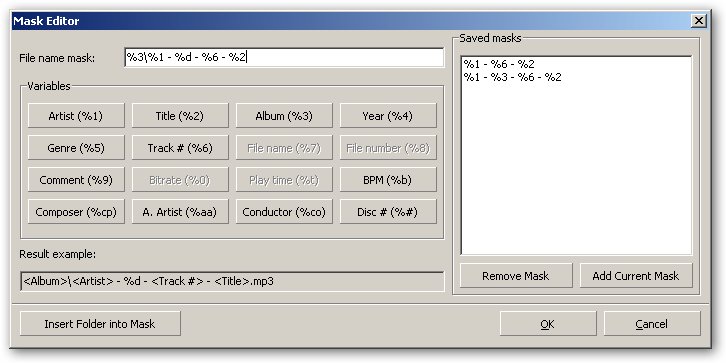
As you can see, the Mask Editor window makes things a little easier. One thing that is not in the mask editor that is shown in the legend is an ignore variable, %d. This variable allows you to have Tag & Rename skip that part of the file and not apply it to anything. And just so you know, these masks can work both as to get the tags or rename the files. So once we have our mask, we select the files, and click the preview window. This shows us what is going to happen before we actually apply it. This comes in handy when you are tagging a large number of files and you want to make sure nothing is going to screw up.
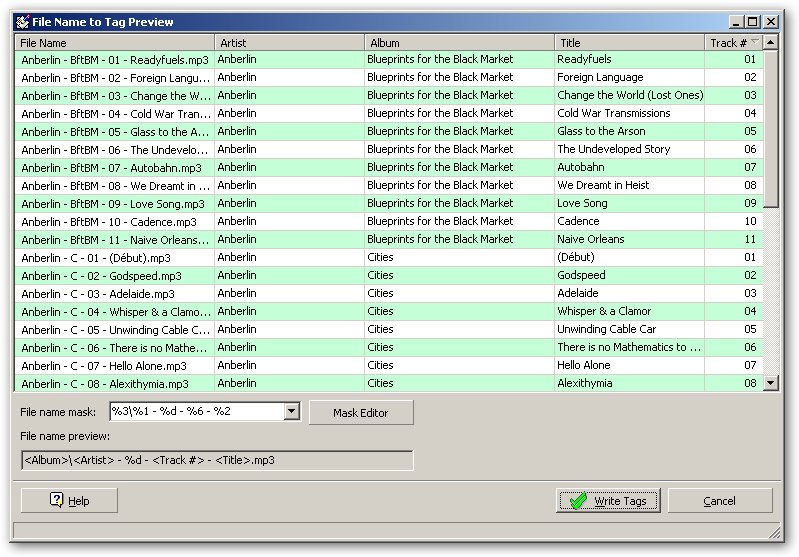
From the looks of things, this move of getting the tags from the file names is going to do a lot of my work for me. Now, this is a perfect case scenario, and I realize that. However, grouping your files together by filename structure can really make this step effective. You can always move things later. Lets look at what happens after I hit that "Write Tags" button.
Look at that, so much more data there now then when we started and this is only after one step. Now that all three albums have some basic tags, let us focus on an individual album to finish things up. The first thing we are going to do now that we have some basic information is perform an Amazon.com lookup. To perform an Amazon.com lookup, hit Ctrl-A when inside a single album’s folder, then hit F10. Hitting F10 will bring up the Amazon.com lookup dialog.
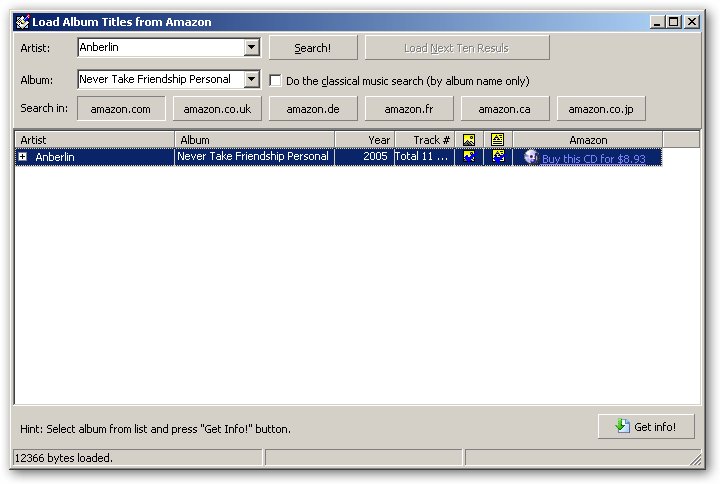
Assuming that the album we are looking for comes back in a search we can click on the "Get Info!" button to see what is going to get tagged with what.
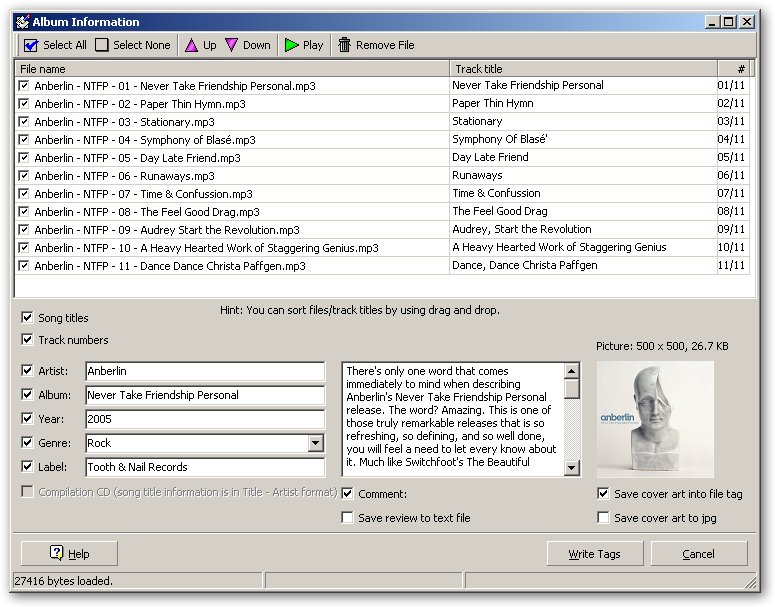
As you can see, I am going to tag this album with all kinds of information including a comment and the album art. You might also notice that things like Artist, Album, Year, Genre, and Label are editable. This is some if you do not agree with something, you can modify it to your liking before it is written to the tags. I would recommend checking the "Save cover art to jpg" checkbox so that Tag & Rename writes a "folder.jpg" image to the folder. I personally have that unchecked because I have a personal program that I wrote that does something similar at the end of my organization because I do a couple of special things personally that I we will not concern ourselves with here today. After you have clicked the "Write Tags" button, you will have a lot more data in your ID3 tags. Simply repeat the process for the rest of the albums.
Now we can do the nitpicky stuff. For the nitpicky stuff we are going to only really focus on a couple of items: Album Artist and Disc Number. If you want to utilize AllMusic.com’s Moods to further classify your music, go for it because the more information you handle now, the less you will have to go back and add later. Lets take a look at the Tag Editor dialog.
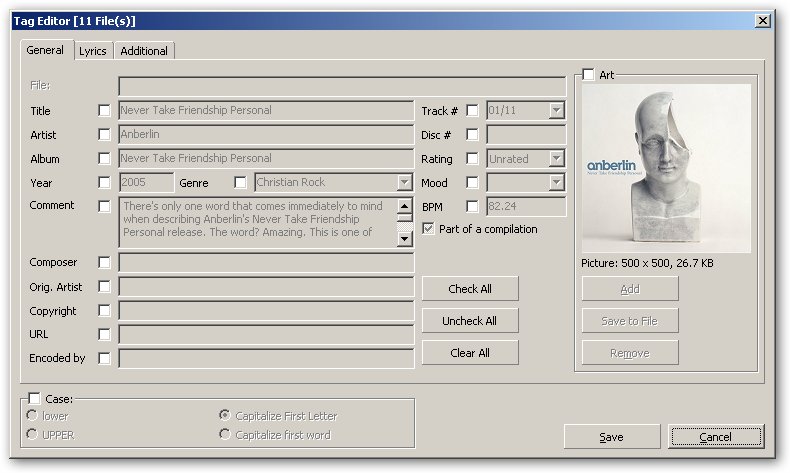
Look at all the stuff we can edit. We can even do lyrics. But let us handle the "Disc #" tag. I tag every digital music file with the disc number, even if the album is only a single disc. I tag with the "1/1" and if there is multiple discs in a set, I will use "1/2" and "2/2" always maintaining the "disc number"/"total in set" separation.
The "Additional" tab will be where we find the "Album Artist" tag for editing. Now, depending on if you went and looked at the options you have for Tag & Rename, the Amazon.com lookup might have already populated the "Album Artist" field for you. If this is the case, excellent, less for us to worry about.
Let me clarify what the difference is between the "Artist" tag and the "Album Artist" tag. The "Artist" tag is the artist(s) as they appear on the CD. For example on Ben Harper’s live album "Live From Mars" the album is credited as "Ben Harper and the Innocent Criminals" so that is what the "Artist" tag would be. The "Album Artist" tag is where the album would be found in a music store, in the Ben Harper example, this would be "Ben Harper" not "Ben Harper and the Innocent Criminals" since if you were shopping for the album you would look under "Ben Harper" to find it.
Another example to demonstrate the difference between the "Artist" and the "Album Artist" tags in ID3 is compilation CDs like movie soundtracks. The "Album Artist" would be tagged with "Various Artists" or "Soundtrack" but something rather generic. On the other hand, the "Artist" tag would get tagged with the name of the artist that actually performed the song. For a specific example, lets look at the Hackers soundtrack. Track number 3 on this sound track is "Voodoo People" by Prodigy. The "Album Artist" tag gets tagged with "Various Artists" while the "Artist" tag gets "Prodigy" in its tag. The purpose for the two different tags is for better organization. You can now search for "Prodigy" to find this song or you can group it as a compilation in iTunes and it will get organized accordingly. Allowing some form of separation.
With these two items done, you should have some nicely tagged digital music files. You are now ready to get these files organized into folder and file structures that will make it easy for you to locate the files on your hard disk later. You have two main options for organizing your music on your hard disk. The simplest way, is to let whatever program you are using to listen to your music handle the organization of the files. This will cause a slight increase in performance in the music playing application since it has that method programmed in already. Most of the more popular players have an option to allow them to organize the folders and files on your hard disk. I know for a fact that iTunes and Media Monkey have such an option. The harder way is to do it yourself. You can do this in Tag & Rename by utilizing the "Rename Files (F4)" tab. This uses a mask editor just like the "Get Tags from File Name" tab we used earlier. You can even add directory slashes into the mask so that Tag & Rename will create folders for you. If you are not completely picky about the file names of your files, I would recommend you use the simpler of the two options and have your music player organize the files for you.
So there you have it, you should now be able to use Tag & Rename to tag your digital files well enough to know what they are and keep them organized. If you need help, please feel free to leave a comment or email me with your questions.
Next week, we are going to do some small things to finish things off like, adding beats per minute information and normalizing the volume.
[Technorati Tag: Technology]
[Technorati Tag: Music]


